Preparing your home dance studio floor for DIY vinyl floor installation
/Vinyl floors are a wonderful way to give a professional look and feel to your home dance studio. Vinyl gives the same smoothness as a wood floor, is easy to clean and care for, and can be installed by DIY-ers even with no experience. Vinyl also dampens sound and vibration, so your downstairs neighbors won't even know that you are dancing!
Here, we will discuss the best way to prepare the floor of your studio space for vinyl flooring installation. This post is part 1 in a series about vinyl flooring installation for home dance studios.
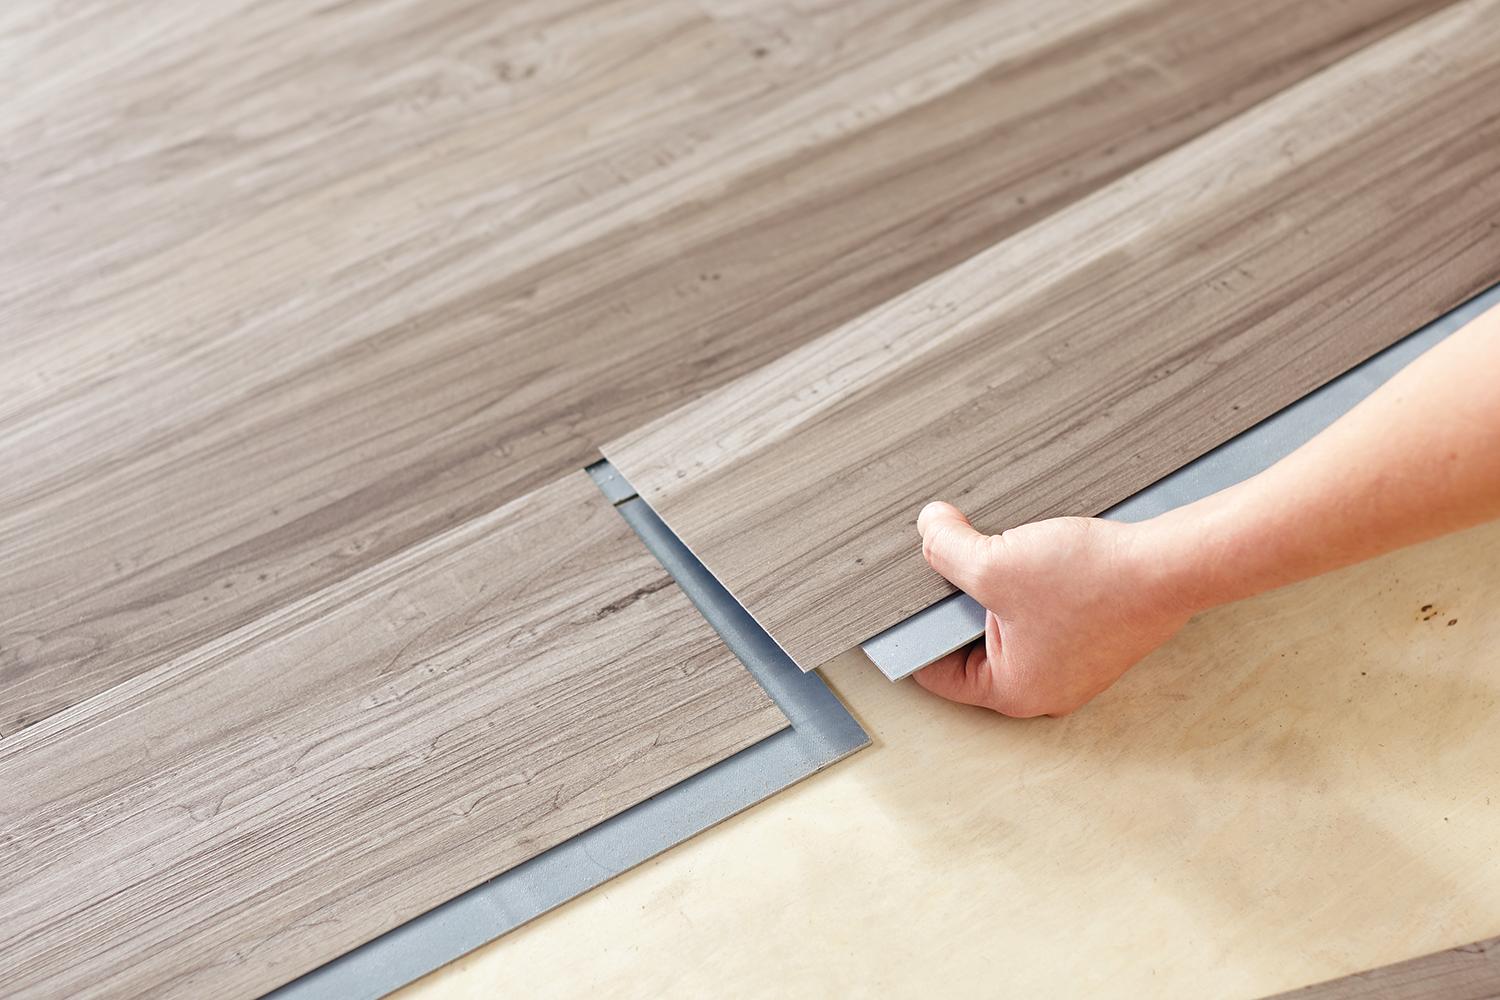
In previous posts, we have looked at how to install a marley floor on your dance studio floor. Marley is a wonderful material for ballet, jazz, and hip hop, but sometimes you want a floor that feels more like the wood you might be dancing on in ballroom, swing, or tap. Home installation of wood floors can be quite expensive and difficult to do. A great budget alternative is to set up a floating vinyl floor over your existing studio floor.
Vinyl floors can be as cheap as 2 or 3 dollars per square foot. Professional installation may cost just as much in labor- here we will show you how to lay down your own flooring, saving you hundreds of dollars.
Step 0: Pull up carpet from the floor
If you currently have carpet on your studio floor, you will need to rip up the carpet. If you have a linoleum, concrete, or wood floor, skip to step 1.
Carpet, while comfortable for walking, can be bad for dancing. The added friction between your feet and the carpet increases the risks of twisting injuries, such as ankle sprains or other knee problems. There's also the risk of carpet burn!
You aren't able to install a new vinyl floor on top of existing carpet. Carpet makes for a bumpy surface, so your vinyl floor will not rest evenly across the room. Therefore, your first order of business is to pull up the old carpet. For this step, you'll only need a utility knife, pliers, and a hammer.
Start at the corner of the room. Using your pliers, grab onto the carpet and pull away from the floor. Eventually, the carpet will break free from the floor. Cut the carpet from the bottom side using your utility knife into long strips.
Underneath the carpet you see may be a squishy, composite looking material called the carpet pad. This also needs to be removed. The carpet pad is usually attached to the floor by extremely sharp staples. The staples are often close to the perimeter of the pad. Use your pliers to pull these staples up. You can collect these staples and put them into a rigid container for safe disposal.
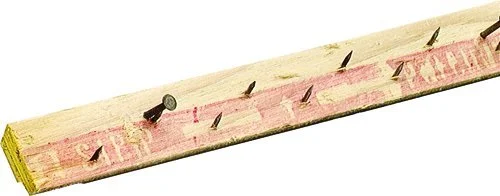
Along the perimeter of the room is a strip of nails that is used to hold the carpet in place. You should be particularly wary of these dangerous strips of wood. They have small nails about one inch apart pointing upwards at an angle. My best advice, for your safety, is to remove these strips immediately as the carpet comes up. To do so, look for the large nails that are used to hold the strips to the floor. With your pliers, grab a hold and pull upwards slowly but firmly. Once they separate from the floor, you can either use a hammer or screwdriver to remove them completely.
To safely dispose of the carpet, cut into strips. Wrap the nail strip inside the carpet pad and roll the carpet tightly towards one end. Using some packing tape or duct tape to keep the roll tight at the end. Carpet is deceptively heavy, so do not attempt to pack up the carpet from your entire room into one giant roll. Keep your strips short, three feet at the longest, for easy transport.
Most likely, you have a wooden subfloor underneath the carpet. Proceed to step 1b!
Step 1a. Installing vinyl over linoleum / vinyl
if you have a linoleum or vinyl floor, you're in luck: you don't need to remove it to put another floor down. In fact, it is preferable to put the new vinyl floating floor directly on top of a previous vinyl or linoleum floor!
First of all, you'll want to clean the floor lightly using a standard floor cleaner. Alternatively, consider using a little bit of dish detergent in water. Just mop the floor, and allow it to dry fully overnight. It doesn't have to be spotless, but you'll want to wash out the major pieces of debris and dust.
Step 1b. Installing vinyl over a wooden subfloor
The wooden subfloor is built from a thick plywood over top of the frame of the house. Because of this, there are nails that are used to hold the subfloor to the frame. Some of these nails may not be properly put in; these need to hammered until they are flush with the floor. This is also a great chance to fix those squeaks in the floor! Tightly secure any areas that make these noises by hammering nails through the floor.
Don't use water to clean the subfloor if it is plywood. Instead, use a shop vacuum and try to suck up all the tiny pieces of debris, especially in the corners and underneath the baseboards. You'll want this to be as free from stuff as possible when you put in your new floor.
If the house was built in the 80s or earlier, you might be lucky and find that you have a hardwood floor. You might want to reconsider your plans to cover that floor with vinyl: hardwood is a beautiful surface!
Step 1c. Installing vinyl over a concrete floor

Concrete is a fine surface for dancing. After all, the original hip hop dancers, the B-Boys and B-Girls of New York, used concrete surfaces for years!
But, concrete can be a very hard surface, which can be painful in the short term, and can increase stress on the body's joints. The alternative therefore, is to put a vinyl surface on top of the concrete, which can provide a little bit of cushioning to your dance studio floor.
With concrete, you need to be concerned with humidity. Try putting a 2 or 3 foot section of square scrap vinyl over an area of the concrete and duct tape all the edges down. Leave for three days, then pull up the tape. If it comes off easily, it means that the concrete has too much humidity, and your vinyl flooring may not be suited for the surface.
Step 2. Level the floor
It would also be preferable that the floor is flat. In fact, most floating vinyl floors cannot be installed if there is more than a 5% change in height over 3 feet. Most of the time, especially in newer houses built after 1990, the floor will already be level enough to install your new dance studio floor without having to do any leveling.
Pass your level across the floor surface. Note where the high spots and low spots are. For high spots, you can use a belt sander with medium grit sandpaper to thin the areas that are high. For safety purposes, please use a face mask or respirator with a shop vacuum to capture as much of the dust as possible.
You'll also want to raise the low areas of the floor. You can use ready mix floor patching compound, easily available at any home improvement store like Home Depot, to raise the dips in the floor. Use a paint stirring stick to mix it up, and use a putty knife to apply the patching compound. Smooth the edges, and allow to dry as recommended - generally less than an hour. Sand any rough edges, as you did for the elevated areas.
With these steps done, your future home dance studio floor is prepped and ready for your new vinyl floors!